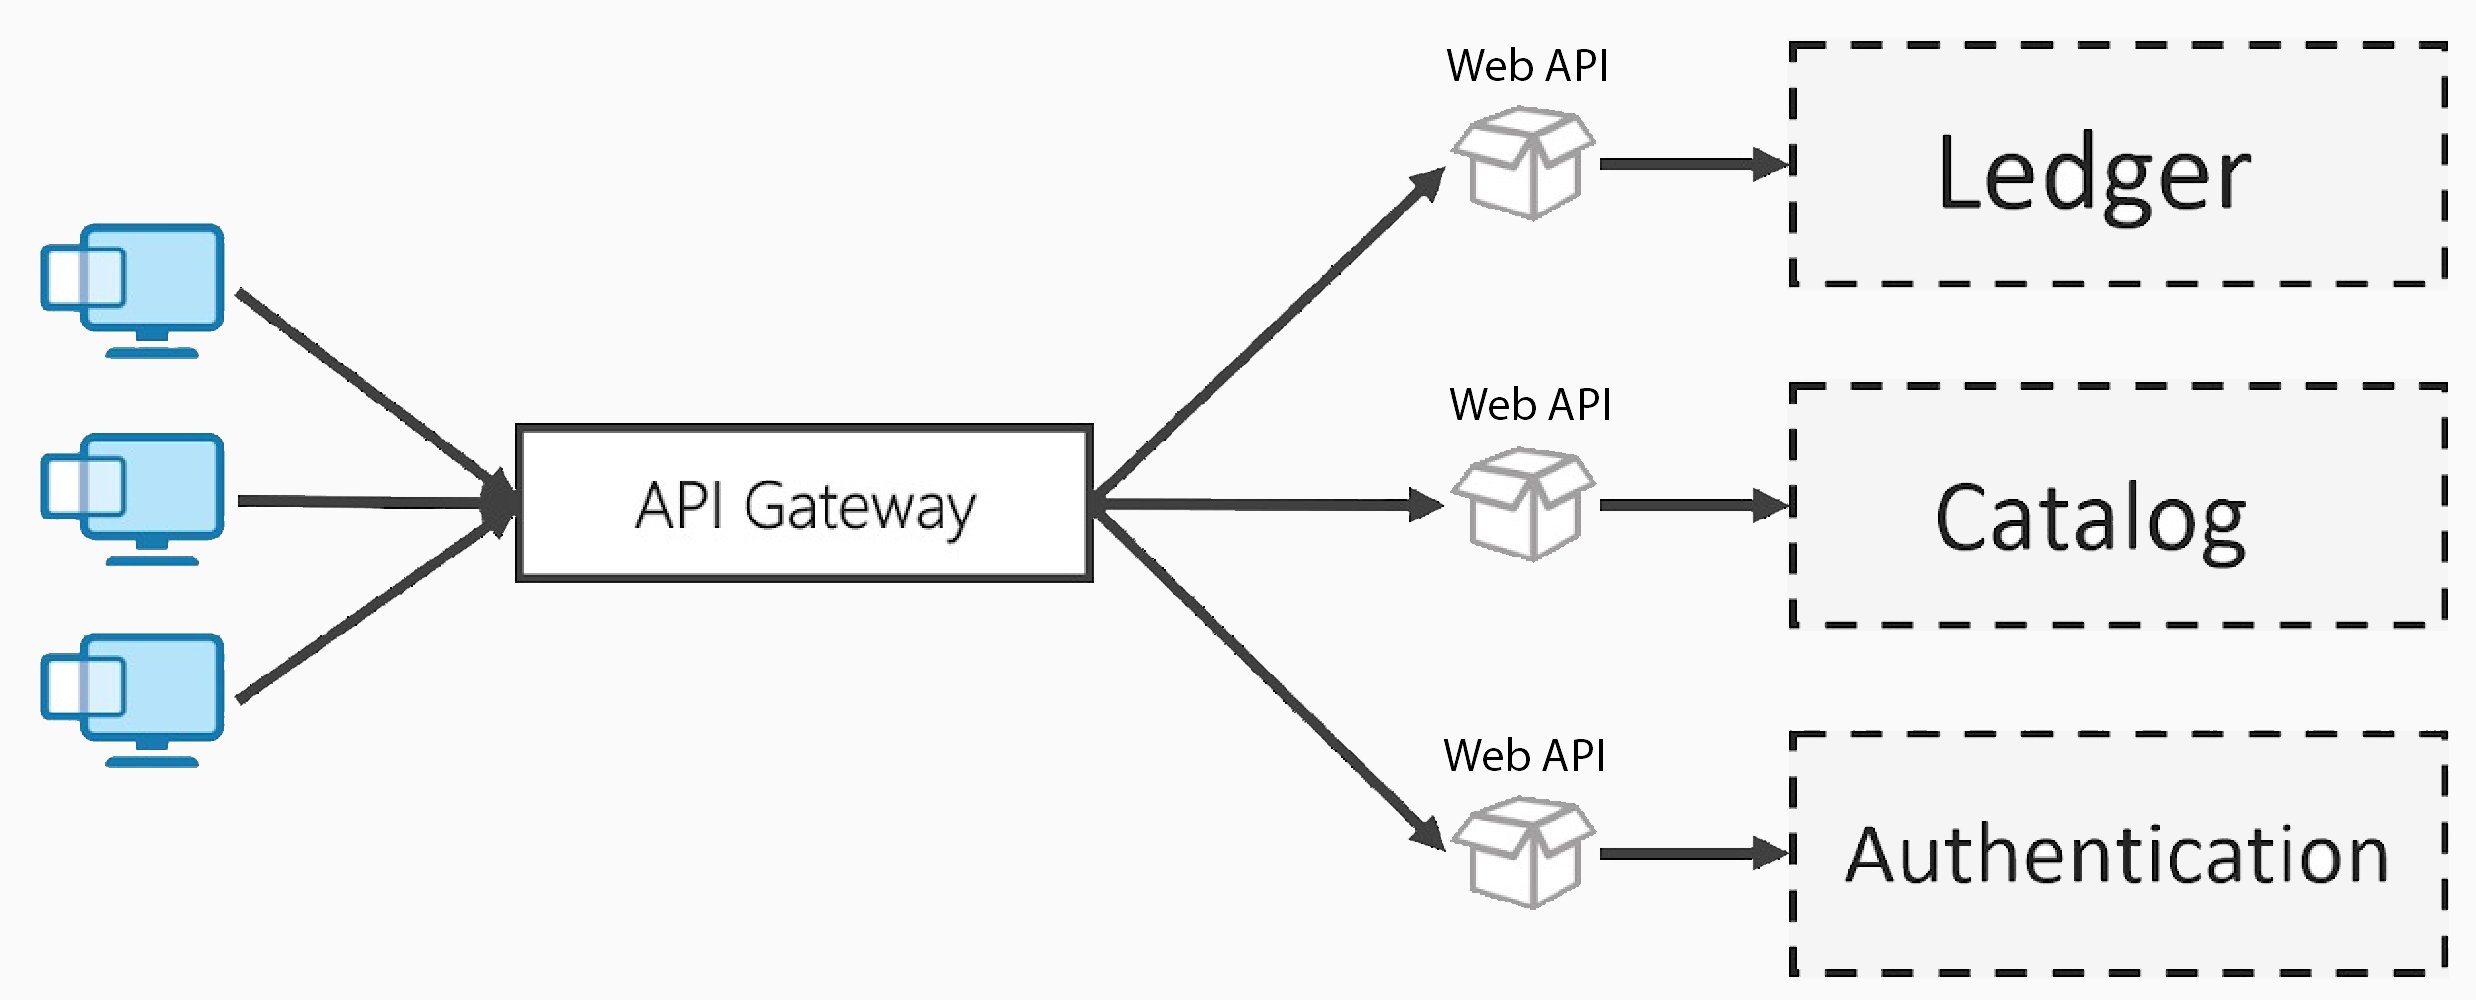
When building a microservices solution without a central entry point, clients must communicate directly with each individual service.
This setup complicates things on both ends.
Handling concerns like authentication, logging and rate limiting must be handled separately in each service, leading to code duplication and inconsistent behavior.
It also becomes difficult to manage routing, versioning and security policies centrally.
An API Gateway addresses these challenges by acting as a single, unified entry point that streamlines, secures and manages all incoming API traffic.
Fortunately, .NET offers several options for implementing an API Gateway. One of the most popular choices is Ocelot.
Ocelot
Ocelot is a lightweight, open-source API Gateway designed for .NET applications.
It serves as a single entry point for client requests and forwards them to the appropriate backend services, making it a great fit for microservices and serverless architectures.
Ocelot supports key features such as request routing, load balancing, authentication, rate limiting, and more.
It's all configurable through a simple JSON file.
In a nutshell, Ocelot is a NuGet package you add to a .NET Web API project to turn it into an API Gateway. It becomes the central entry point that clients interact with, efficiently managing and routing requests behind the scenes.
Now, let’s dive in and set up our API Gateway with Ocelot.
Getting Started
To get started with Ocelot, you'll first need to add new Web Api project and install the necessary NuGet packages. You can do this via the NuGet Package Manager or by running the following command in the Package Manager Console:
dotnet add package OcelotOnce the project and package are in place, you’ll need to update your Program.cs file to integrate Ocelot:
var builder = WebApplication.CreateBuilder(args);

builder.Configuration.AddJsonFile("ocelot.json", optional: false, reloadOnChange: true);
builder.Services.AddOcelot(builder.Configuration);

var app = builder.Build();

await app.UseOcelot();
AddJsonFile loads the ocelot.json file to the application's configuration. This will allow Ocelot to read routing and policy rules.
AddOcelot registers Ocelot services in the dependency injection container.
UseOcelot adds the Ocelot middleware to the request pipeline.
Now that the basic setup is done, it’s time to define your routes and rules in the ocelot.json configuration file.
Configuring ocelot.json
The ocelot.json file contains all the routing rules and global settings needed for Ocelot to function as an API Gateway. Here's a basic skeleton of its structure:
{
  "GlobalConfiguration": {
    "BaseUrl": "https://localhost:5002"
  },
  "Routes": [
  ]
}
The GlobalConfiguration section defines settings that apply across all routes.
In this case, the BaseUrl tells Ocelot that the API Gateway will listen at https://localhost:5002. All incoming requests will be routed through this Url.
The Routes array holds individual route definitions. Each route describes how to:
- Match an incoming request (Upstream)
- Forward it to the appropriate downstream service (Downstream)
At this point, the array is empty, so Ocelot won't route any requests. Let's change that.
To make the example realistic, I added a separate Product.Api project to represent one of the services in a microservices architecture. It exposes standard CRUD endpoints for managing products.
In this case, we’re setting up routes for our Product.Api. Here's what each field means in the Routes array per endpoint:
Below is a completed example of an ocelot.json file that forwards API Gateway requests from /ocelot/products to the downstream Product.Api running at https://localhost:7215:
{
  "GlobalConfiguration": {
    "BaseUrl": "https://localhost:5002"
  },
  "Routes": [
    {
      "UpstreamPathTemplate": "/ocelot/products",
      "UpstreamHttpMethod": [ "Get" ],
      "DownstreamPathTemplate": "/products",
      "DownstreamScheme": "https",
      "DownstreamHostAndPorts": [
        {
          "Host": "localhost",
          "Port": 7215
        }
      ]
    },
    {
      "UpstreamPathTemplate": "/ocelot/products/{id}",
      "UpstreamHttpMethod": [ "Get" ],
      "DownstreamPathTemplate": "/products/{id}",
      "DownstreamScheme": "https",
      "DownstreamHostAndPorts": [
        {
          "Host": "localhost",
          "Port": 7215
        }
      ]
    },
    {
      "UpstreamPathTemplate": "/ocelot/products",
      "UpstreamHttpMethod": [ "Post" ],
      "DownstreamPathTemplate": "/products",
      "DownstreamScheme": "https",
      "DownstreamHostAndPorts": [
        {
          "Host": "localhost",
          "Port": 7215
        }
      ]
    },
    {
      "UpstreamPathTemplate": "/ocelot/products/{id}",
      "UpstreamHttpMethod": [ "Delete" ],
      "DownstreamPathTemplate": "/products/{id}",
      "DownstreamScheme": "https",
      "DownstreamHostAndPorts": [
        {
          "Host": "localhost",
          "Port": 7215
        }
      ]
    },
    {
      "UpstreamPathTemplate": "/ocelot/products/{id}",
      "UpstreamHttpMethod": [ "Put" ],
      "DownstreamPathTemplate": "/products/{id}",
      "DownstreamScheme": "https",
      "DownstreamHostAndPorts": [
        {
          "Host": "localhost",
          "Port": 7215
        }
      ]
    }
  ]
}
Here's the breakdown:
- UpstreamPathTemplate - Path clients call via the API Gateway
- UpstreamHttpMethod - Http method/s expected for that route
- DownstreamPathTemplate - The corresponding path on the downstream service
- DownstreamScheme - Specifies the protocol, http or https
- DownstreamHostAndPorts - Host and port where the downstream service is running
Now you can run both the API Gateway and the Product.Api project.
Client applications should send requests to the /ocelot/products routes:
- GET https://localhost:5002/ocelot/products
- POST https://localhost:5002/ocelot/products
- PUT https://localhost:5002/ocelot/products/{id}
- DELETE https://localhost:5002/ocelot/products/{id}
The API Gateway will then forward these requests to the Product.Api service behind the scenes.
Features
Ocelot offers far more than just basic request routing.
It supports dynamic configuration updates at runtime.
You can also define Aggregate Routes, which merge responses from multiple downstream services into a single response.
Beyond that, Ocelot includes powerful features such as authentication, authorization, caching, load balancing, rate limiting and more.
Honestly, just listing everything it can do could fill an entire blog post (or two) on its own. 😄
Conclusion
Implementing an API Gateway is a must when building a microservices architecture.
Ocelot makes this process simple and powerful in the .NET ecosystem with minimal setup.
If you're looking for a lightweight yet capable API Gateway for your APIs, Ocelot is definitely worth considering.
This is one of those topics that would be much easier to explain in a video, but I hope I managed to give you a solid introduction to Ocelot.
If you're interested in exploring more of its features, feel free to reach out!
If you want to check out examples I created, you can find the source code here:
Source CodeI hope you enjoyed it, subscribe and get a notification when a new blog is up!