Lately, I haven’t worked on traditional Web APIs much.
Azure Functions have proven to be a far cheaper and more flexible alternative for most of the applications I build these days.
They get me covered for everything from event-driven triggers, background jobs to lightweight APIs.
In this post, we’ll explore the fundamentals to get you up to speed with Azure Functions.
Azure Functions
Azure Functions are a serverless solution that allows you to build robust apps while using less code and with less infrastructure at lower costs.
These triggers can be anything from an HTTP request, a message in a queue, a file upload or a scheduled timer.
Functions provide a wide range of event-driven triggers and bindings, allowing you to connect to other Azure services like Blob Storage, Service Bus and more without extra boilerplate code.
Durable Functions
Azure Functions can also be durable, meaning they can maintain state across multiple executions.
This is especially useful when you need to orchestrate complex workflows or chain multiple functions together.
However, they’re a deep topic on their own, so I’ll cover Durable Functions in a dedicated post soon.
Getting Started
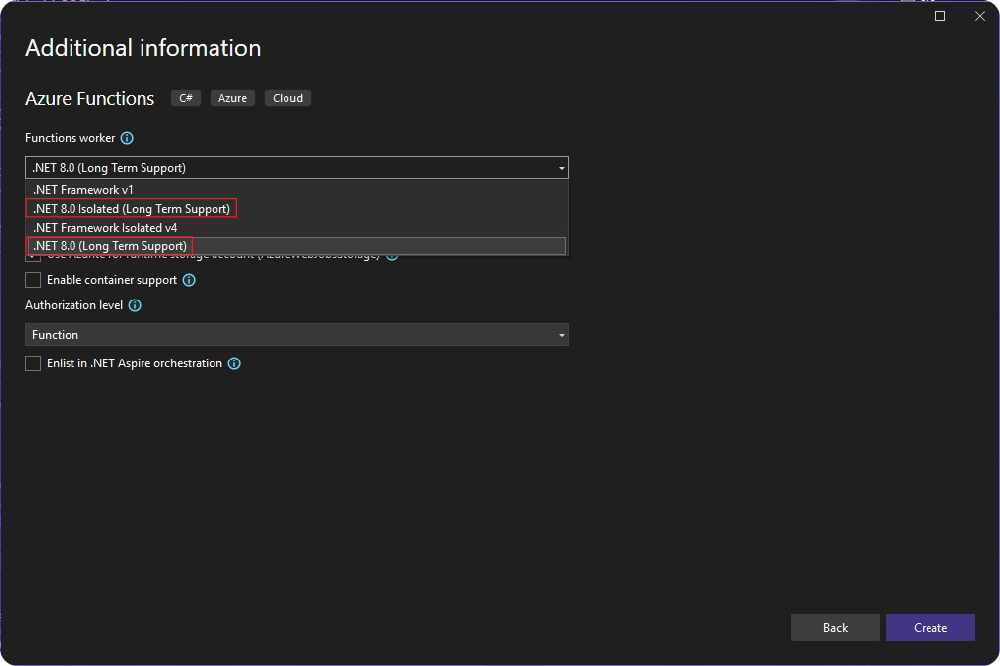
When creating a new Azure Functions solution, choosing functions worker is often the first decision point you’ll encounter:
In-Process vs Isolated
You’ll notice two options for the .NET runtime version:
- .NET (in-process) option
- .NET Isolated option
The .NET option uses the in-process model, which means your code runs in the same process as the Azure Functions host.
The .NET Isolated option uses the isolated worker model, meaning your code runs in a separate .NET process, independent from the host.
From a developer’s perspective, both models behave similarly, except the isolated model has middleware support, giving you more flexibility to handle cross-cutting concerns.
However, the main and most important reason you should use .NET Isolated is that the in-process model is being retired.
.NET isolated supports both LTS and STS while in-process model will no longer be an option after November 10, 2026, when its support officially ends.
If you’re starting a new project or maintaining an existing one, migrating to .NET isolated is the best move forward.
Dependency Injection
Dependency Injection (DI) in the Azure Functions Isolated Process model works very similarly to what you’re already used to in ASP.NET Core.
var host = new HostBuilder()
    .ConfigureFunctionsWebApplication(builder =>
    {
        builder.UseMiddleware<CustomMiddleware>();
    })
    .ConfigureServices((context, services) =>
    {
        var configuration = context.Configuration;

        services.AddDbContext<ApplicationDbContext>(options =>
            options.UseNpgsql(configuration["Postgres"]));

        services.AddScoped<IProductService, ProductService>();
    })
    .ConfigureOpenApi()
    .Build();
HostBuilder() creates a new host instance.
ConfigureFunctionsWorkerDefaults() configures the default set of Functions Worker services (set of converters, logging, environment variables and more).
ConfigureFunctionsWebApplication() replaces ConfigureFunctionsWorkerDefaults() if you would want ASP.NET Core middleware or routing integration for HTTP functions.
ConfigureServices() registers your own dependencies for DI.
Run() starts the host and keeps it running while Azure invokes your functions.
You can easily register and inject your own services, configuration or data access layers, keeping your functions clean, testable and well-structured:
Triggers
Lastly, your Azure Functions react to triggers, which determine when and why your code executes.
Azure functions offer a rich variety of triggers and bindings to cover most scenarios:
- Blob Storage
- Azure Cosmos DB
- Service Bus
- Timer
- HTTP Trigger and much more
Here's full List of Supported Bindings.
Additionally, here are some simple examples to help you see how easy it is:
[Function(nameof(TimerFunction))]
[FixedDelayRetry(5, "00:00:10")]
public static void Run(
    [TimerTrigger("0 */5 * * * *")] TimerInfo timerInfo,
    FunctionContext context)
{
    var logger = context.GetLogger(nameof(TimerFunction));
    logger.LogInformation($"Function Ran. Next timer schedule = {timerInfo.ScheduleStatus?.Next}");
}public class GetProductById(IProductService productService)
{
[Function(nameof(GetProductById))]
[OpenApiOperation(operationId: nameof(GetProductById), tags: ["Products"])]
[OpenApiParameter(name: "id", In = ParameterLocation.Path, Required = true, Type = typeof(Guid))]
[OpenApiResponseWithBody(statusCode: HttpStatusCode.OK, contentType: "application/json", bodyType: typeof(Product))]
[OpenApiResponseWithoutBody(statusCode: HttpStatusCode.NotFound)]
public async Task<IActionResult> Run(
[HttpTrigger(AuthorizationLevel.Anonymous, "get", Route = "products/{id}")] HttpRequest httpRequest,
Guid id)
{
var response = await productService.GetById(id);
return response.IsSuccess
? new OkObjectResult(response.Value)
: new NotFoundResult();
}
}Pricing
One of the biggest advantages of Azure Functions is how cost-effective they are.
For example on the consumption plan you get:
- 1 million executions per month for free
- 400,000 GB-s of resource consumption per month for free
That means you can often run production-level workloads for few dollars a month or even free, depending on your usage.
Each Function App automatically includes an Azure Storage Account and it is not part of the free grant, however, storage costs are typically negligible unless using Durable Functions or storing large amounts of data.
Conclusion
Azure Functions offer a flexible, cost-effective and scalable way to build modern applications.
It's great for event-driven workloads, fast development with minimal infrastructure overhead.
The Consumption Plan pricing makes it possible to run production workloads at minimal cost, making Functions an ideal choice for startups, side projects or even larger scale applications.
If you want to check out examples I created, you can find the source code here:
Source CodeI hope you enjoyed it, subscribe and get a notification when a new blog is up!